

- Automated setup (recommended) — Origin manages the Entra application for you. There’s no app registration to create, no Microsoft Graph permissions to add, and no client secret to generate or rotate. The whole flow takes about two minutes. This is the method below.
- Manual setup (advanced) — register and manage your own Entra app registration, Graph permissions, and client secret. Use this only if your organization requires full control over the app registration and credential rotation. See Manual setup (advanced) further down this page.
Automated setup
Origin now manages the Entra application for you. There is no app registration to create, no Microsoft Graph permissions to add, and no client secret to generate or rotate. You give one-time tenant-wide admin consent to Origin’s verified application, choose what to sync, and you’re done.What you’ll end up with
Before you begin
You need:- A Microsoft Entra admin who can grant tenant-wide admin consent — the Global Administrator, Privileged Role Administrator, or Cloud Application Administrator role. This is the only Microsoft-side privilege the flow requires.
- An Origin admin account — only Origin admins can create directory integrations.
- An app registration, a service principal, Graph API permissions, a redirect URI, or a client secret. Origin’s managed application (published and verified as Prelude Research Inc.) handles all of that.
Setup steps
Open Directory Integrations in Origin
- Sign in to the Origin dashboard at dashboard.originhq.com.
- Click Admin in the left sidebar, then select Identity.
- On the Integrations tab, click Add Integration (or the empty-state prompt if this is your first one).
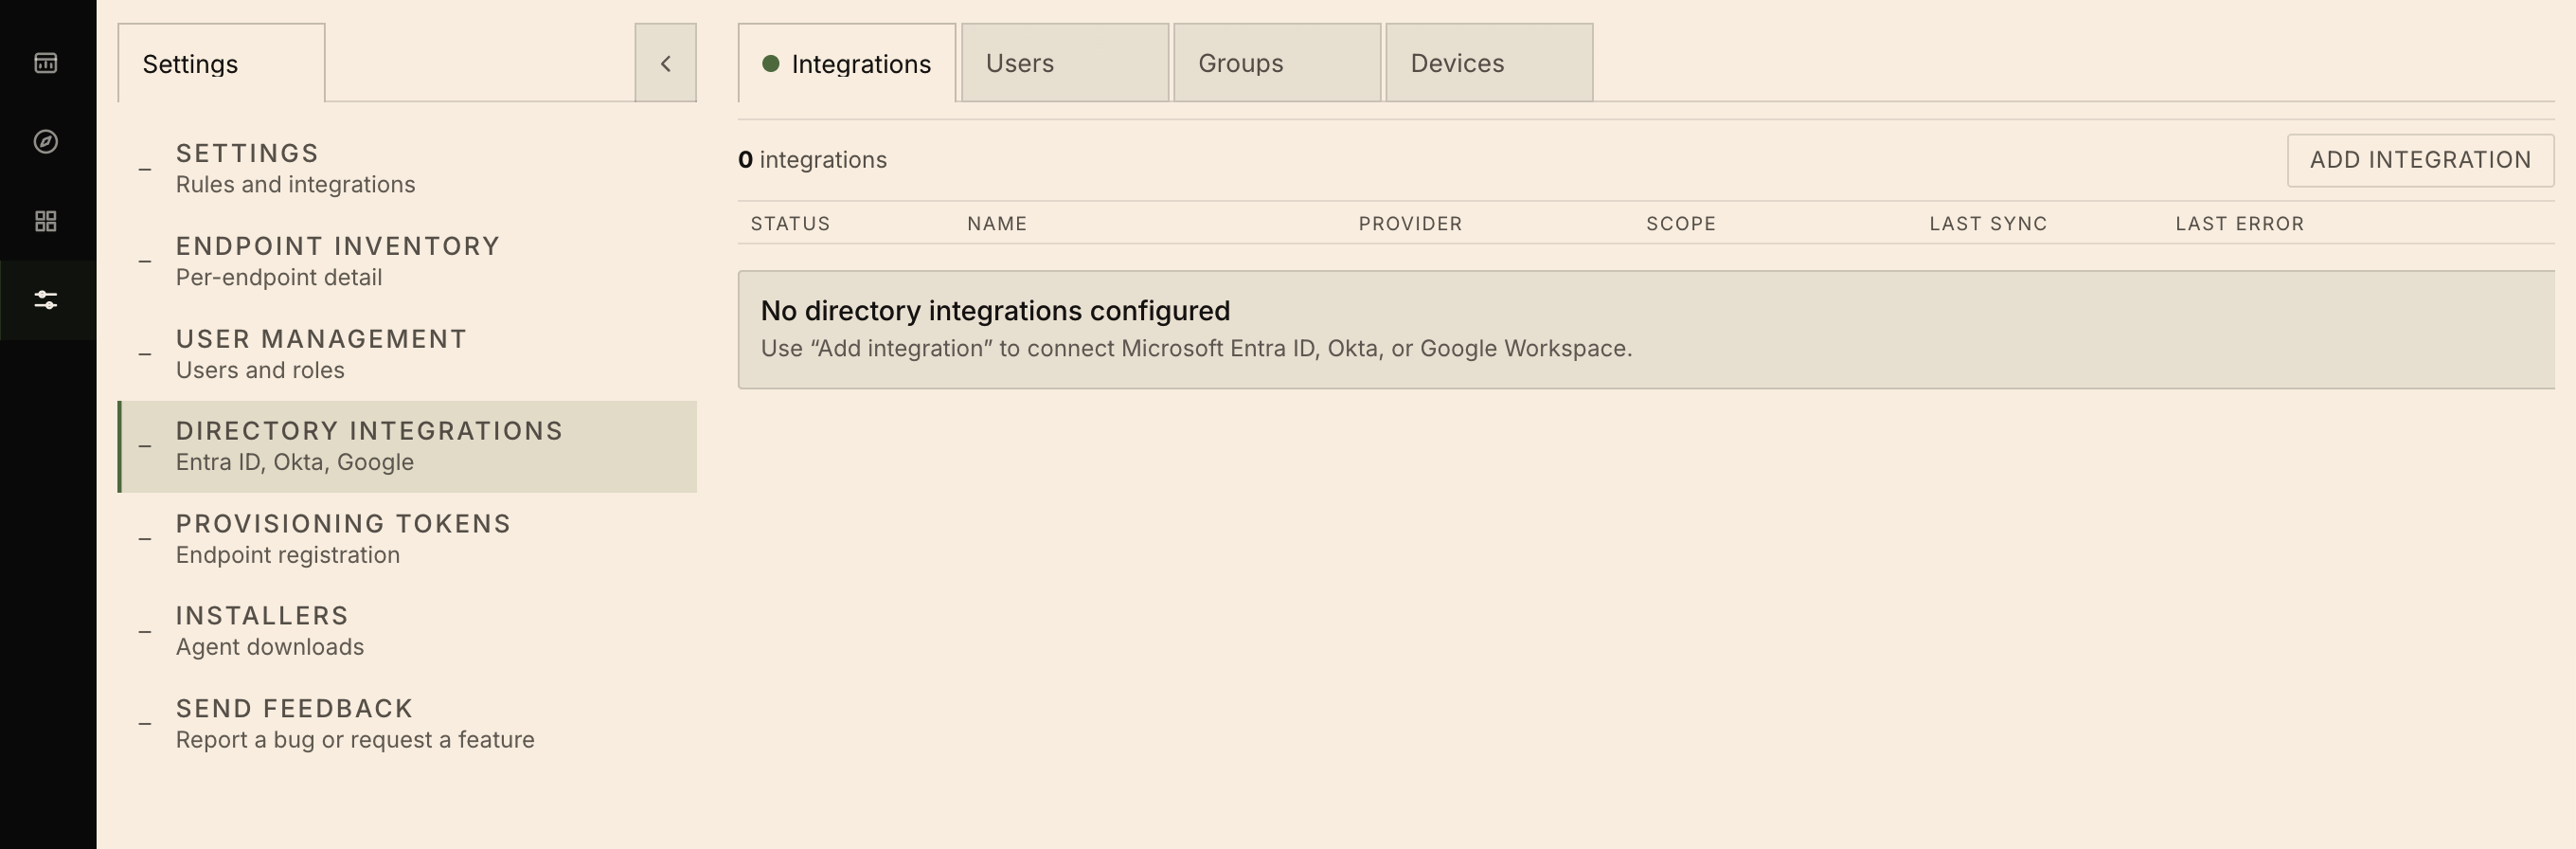
Start a new Entra integration
- Display name — a label for this integration, e.g.
OriginHQ. This is required and is only used to identify the integration in the list. - Provider — leave this set to Microsoft Entra ID. (Use Change if you need a different provider.)
- Note the message: “Origin manages the application registration and signing credentials — there’s nothing to enter.”
- Click Connect Microsoft Entra.
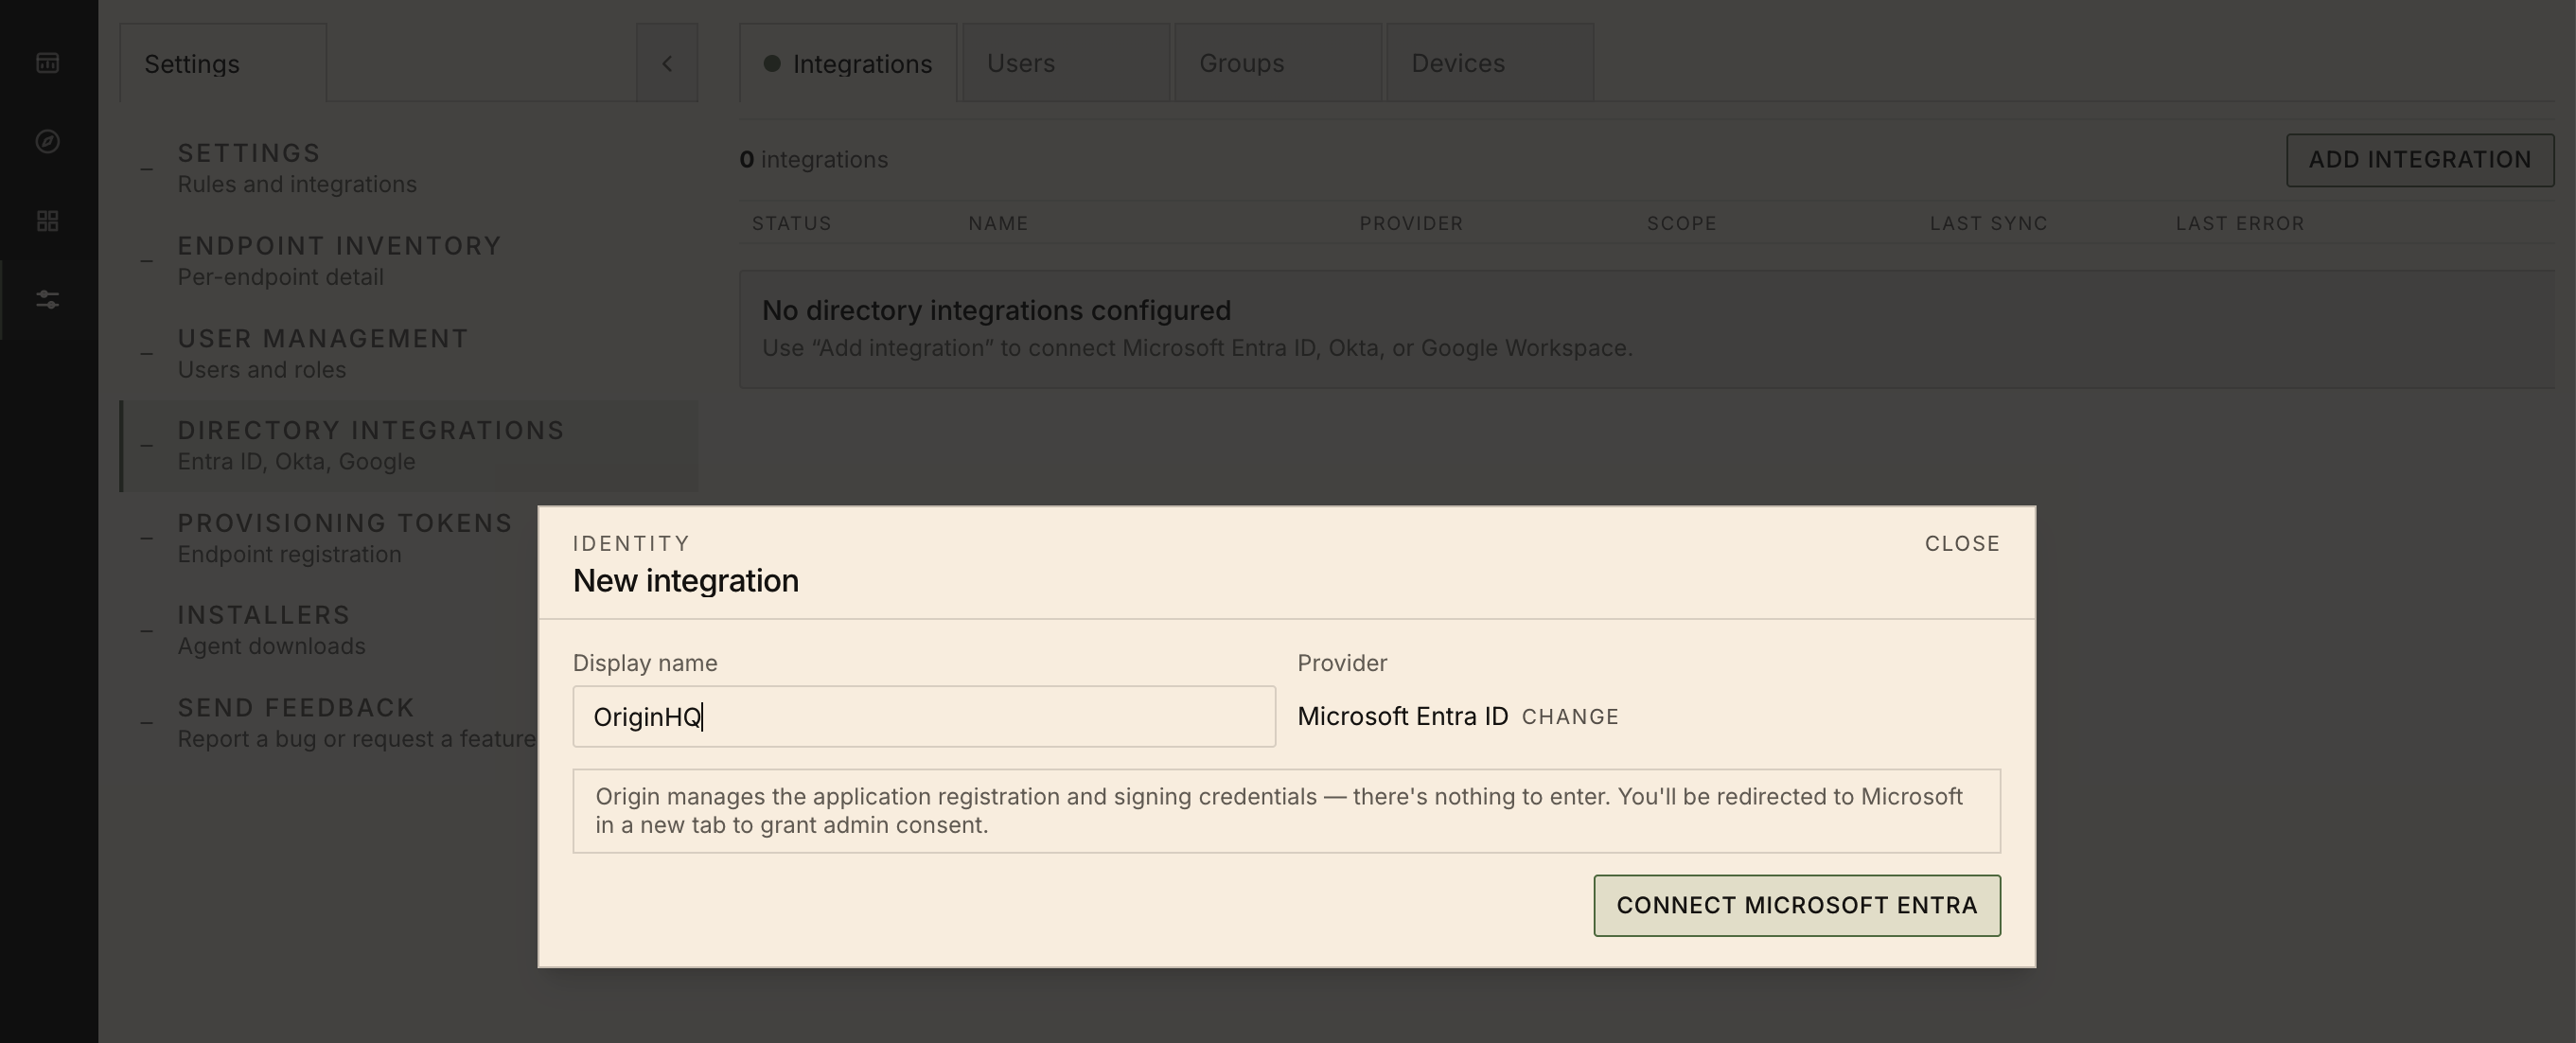 Origin saves the integration and opens Microsoft’s admin-consent page in a new tab.
Grant admin consent in Microsoft
- Pick an account — choose (or sign in as) an account that holds one of the admin roles listed in Before you begin.
- Microsoft shows a Permissions requested — Review for your organization screen for the Prelude Research Inc. application. The app requests read-only access to:
Consent screen wording What Origin uses it for Sign in and read user profile Completes the consent sign-in. Read all users’ full profiles Populates the Users tab and user → group joins. Read all groups Enumerates groups, members, and nested-group edges. Read all devices Enumerates Entra-joined and Entra-registered devices. Read Microsoft Intune devices Brings in Intune-managed devices with hardware serial numbers for endpoint correlation. Read organization information Reads tenant-level directory details. Read all audit log data Supplies each user’s last sign-in time for stale-account detection. Read activity data for your organization Usage/activity reporting across the tenant. Read all AI enterprise interactions Enables Microsoft 365 Copilot capture (optional; you enable it separately). 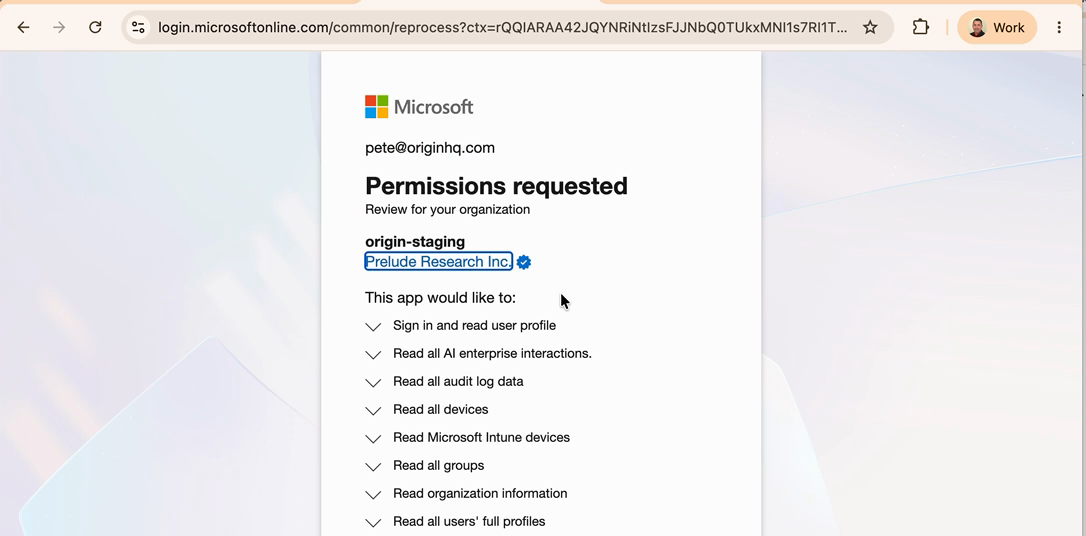
- Click Accept. Consent applies to all users in your organization — no one else is prompted.
Choose what to sync
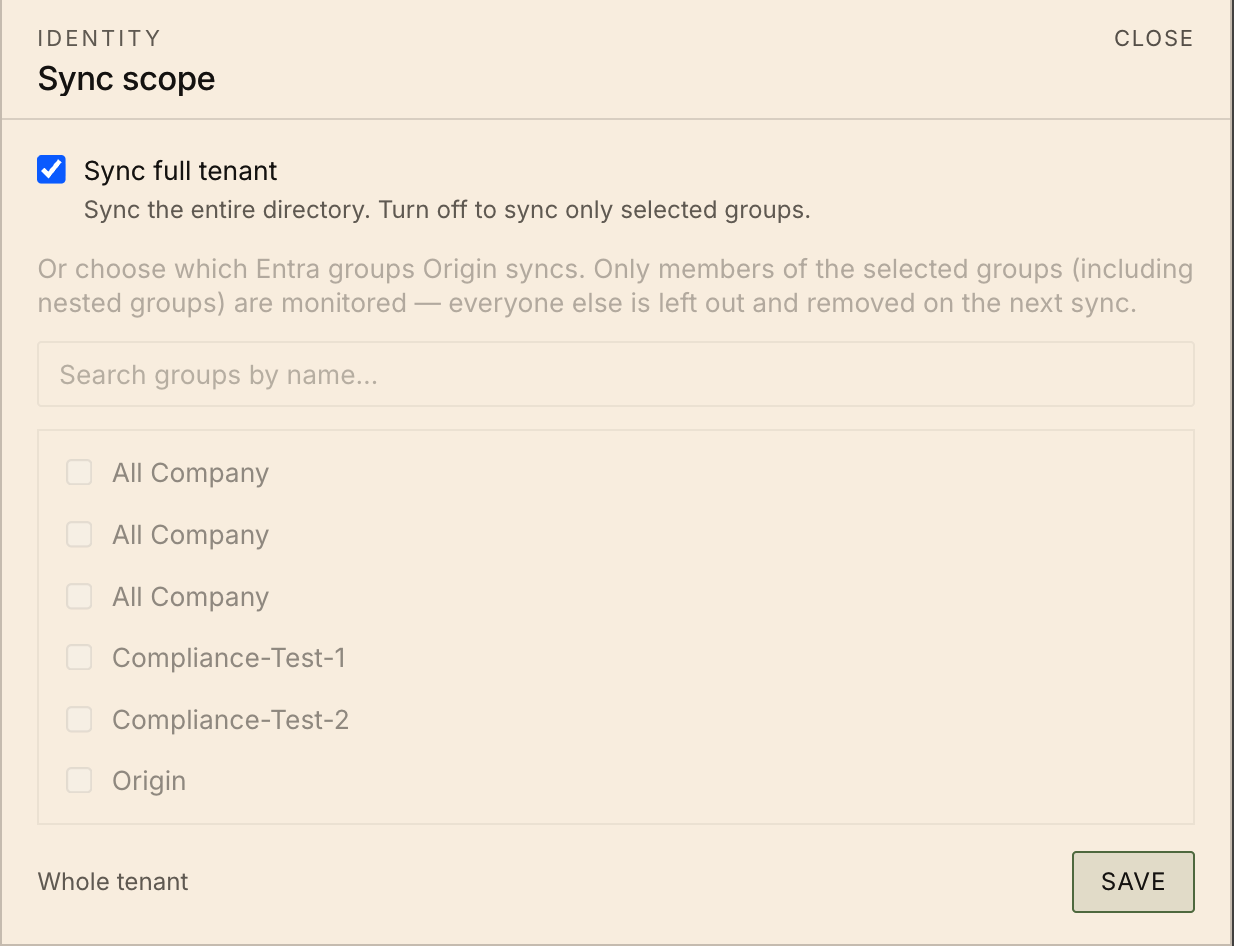
- Leave Sync full tenant off, then use Search groups by name and tick the Entra groups you want. Only members of the selected groups — including members of nested groups — are monitored.
- Everyone outside the selected groups is left out, and anyone previously synced but no longer in scope is removed on the next sync.
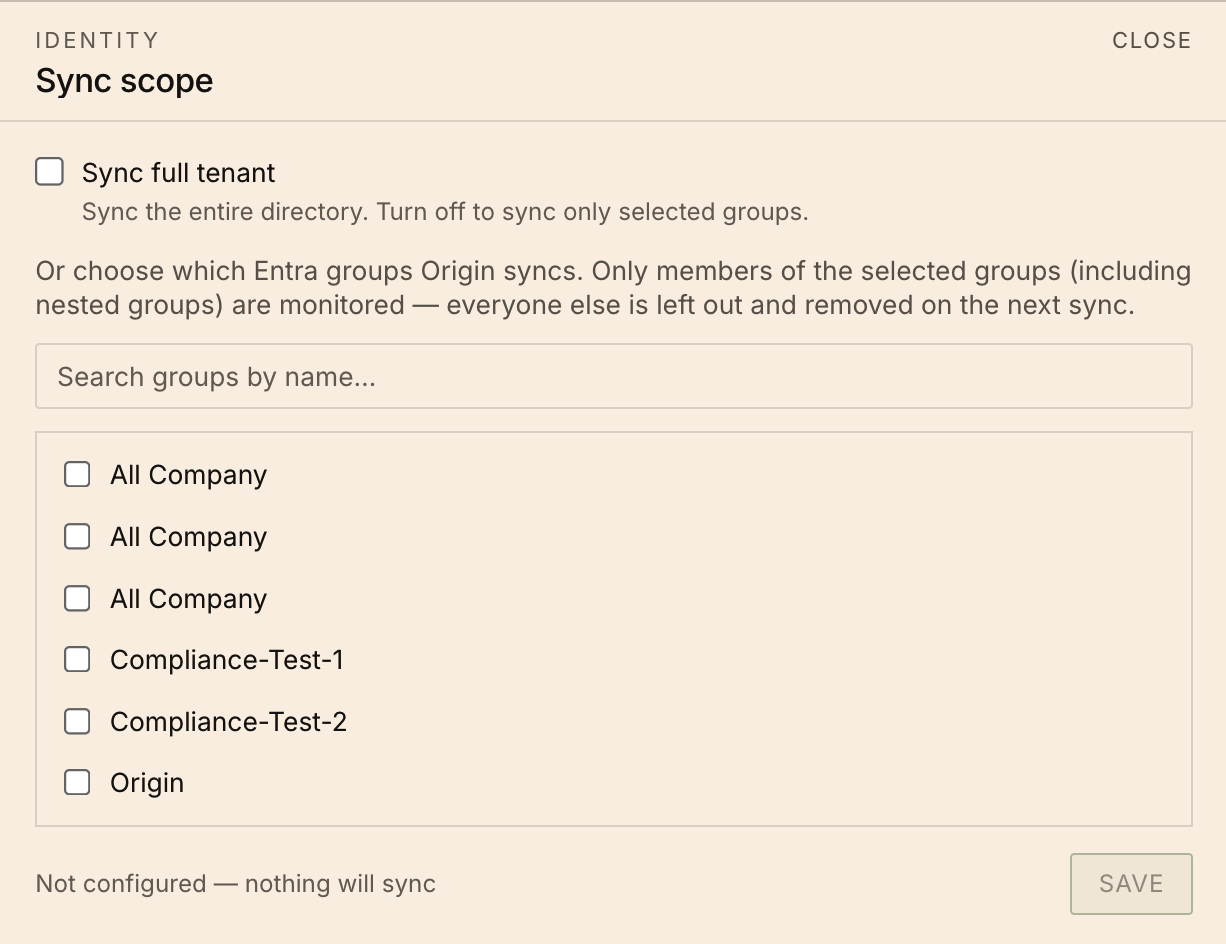 Sync the whole tenant
- Turn on Sync full tenant to sync your entire directory. The group list is disabled and the dialog footer reads Whole tenant.
View the integration status
- Status — Connected (green).
- Name — the display name you entered.
- Provider — Microsoft Entra ID.
- Scope — Whole tenant, or the groups you selected.
- Last Sync — the time of the most recent sync.
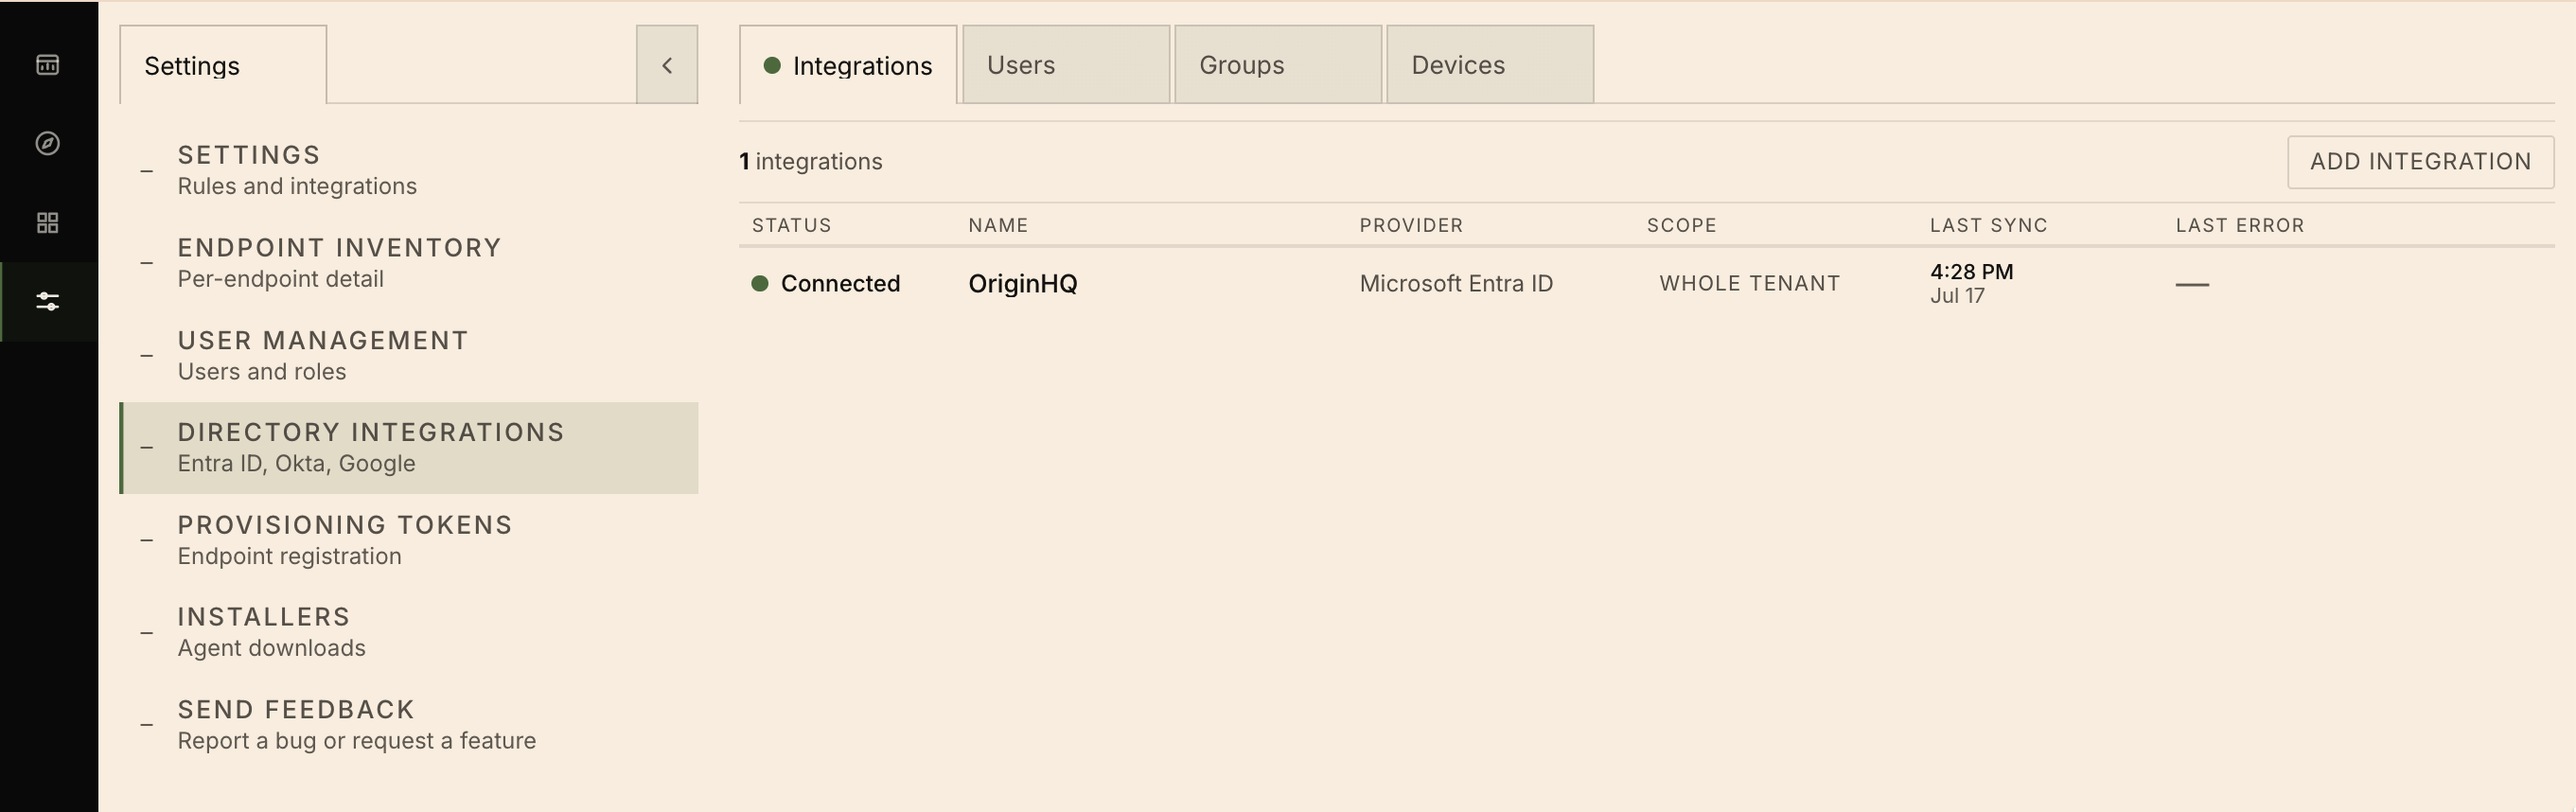 To change what syncs later, click the Scope value on this row to reopen the Sync scope dialog; the change takes effect on the next sync.
Verify in the Directory Browser
- Users — should list everyone in scope. Click any user to see their direct groups; click a group to deep-link into it.
- Groups — click any group to see its direct user members and sub-groups. Click a member to jump back to that user.
- Devices — Intune-managed devices show a hardware serial number; Entra-joined devices that Intune hasn’t seen show the device’s display name. Both resolve an Owner against the synced users.
What gets synced (and what doesn’t)
Synced:- Users (active and disabled) — display name, email, UPN, department, job title, manager, last sign-in, account-enabled flag.
- Groups — display name, description, type, membership, and nesting.
- Entra-joined / registered devices — display name, OS, OS version, owners.
- Intune-managed devices — serial number, model, manufacturer, assigned user, compliance state, OS.
- Mailboxes, OneDrive, calendars, contacts, or any tenant data outside the directory itself.
- Conditional Access policies or role assignments.
- Guest accounts (
#EXT#UPN suffix) are filtered out at sync time.
Managing the integration
- Re-scope — click the scope column and adjust Sync scope at any time.
- Enable Copilot capture — the admin consent you granted already covers it; turn it on in Microsoft 365 Copilot capture.
- Remove — delete the integration from its row’s actions. Syncing stops; data already in Origin follows your tenant’s retention settings. To also revoke access on the Microsoft side, remove the Prelude Research Inc. enterprise application from Entra → Enterprise applications.
Troubleshooting
The consent tab shows 'needs admin approval' or Accept is disabled
The consent tab shows 'needs admin approval' or Accept is disabled
The integration row stays 'Connected' but nothing appears in the Directory Browser
The integration row stays 'Connected' but nothing appears in the Directory Browser
Only some people appear
Only some people appear
Devices sync but users/groups don't (or vice versa)
Devices sync but users/groups don't (or vice versa)
Sub-groups never appear
Sub-groups never appear
Manual setup (advanced)
Prefer to manage your own Entra app registration, Microsoft Graph permissions, and client secret rotation directly, rather than using Origin’s managed application? Use this method instead of the automated setup above. This method walks through registering an application in your Microsoft Entra ID tenant, granting the permissions Origin needs, and connecting the integration from the Origin dashboard using your own client ID and client secret. The whole flow takes about ten minutes and requires a Microsoft work account with the Global Administrator, Privileged Role Administrator, or Cloud Application Administrator role — anyone who can grant tenant-wide admin consent for an application.What you’ll end up with (manual setup)
Before you begin (manual setup)
You need:- An Entra admin account with one of the roles listed above.
- The Origin dashboard URL for your tenant — the public hostname you sign in to. The redirect URI you’ll register in Entra is
https://<your-origin-hostname>/integrations/oauth-callback. For example, if you sign in athttps://app.origin.example.com, the redirect URI ishttps://app.origin.example.com/integrations/oauth-callback. - Your Origin tenant admin role — only Origin admins can create directory integrations.
last_login in the Directory Browser) is sourced from Entra’s signInActivity resource, which requires an Entra ID P1 or P2 license plus the AuditLog.Read.All Graph permission. On the free tier — or on P1/P2 without AuditLog.Read.All granted — Graph silently omits the field and Origin records the user’s last sign-in as the Unix epoch (1970-01-01). Stale-account detection that relies on this field will be best-effort until both prerequisites are in place. Everything else (users, groups, memberships, devices, owners) is available on the free tier with the permissions in the next step.Manual setup steps
Register the Application in Entra
- Navigate to Identity → Applications → App registrations → New registration.
- Fill in the registration form:
- Name — something a future admin will recognize, e.g.
Origin Directory Sync. - Supported account types — select Accounts in this organizational directory only (Single tenant).
- Redirect URI — select Web and enter
https://dashboard.originhq.com/integrations/oauth-callback. The hostname must match exactly (scheme, host, port, and path). Origin rejects callbacks whose redirect URI doesn’t match what was stamped into the OAuth state.
- Name — something a future admin will recognize, e.g.
- Click Register.
- Application (client) ID
- Directory (tenant) ID
Grant Microsoft Graph API Permissions
- In the same app registration, click API permissions → Add a permission → Microsoft Graph → Application permissions.
- Add all six permissions in the table below. You can search by name; tick the checkbox and click Add permissions between groups if it’s easier.
- After all six are listed, click Grant admin consent for
<your tenant>at the top of the table. You’ll be prompted to confirm — accept. Each row should now show a green check under Status.
<tenant>” with a yellow warning after clicking Grant, your account doesn’t have one of the admin roles listed in the prerequisites. Either get the role assignment or hand this step to someone who has it — only the consent step is gated on it.Confirm the Redirect URI
- Go to Authentication → under Web → Redirect URIs.
- Confirm
https://dashboard.originhq.com/integrations/oauth-callbackis listed exactly as typed. - Leave everything else on this page at its default. Origin does not need the implicit grant flow, ID tokens, or any extra “Front-channel logout” URI.
- Click Save if you changed anything.
Create a Client Secret
- Go to Certificates & secrets → Client secrets → New client secret.
- Description — something descriptive, e.g.
origin-directory-sync-2026-q2. - Expires — pick the longest window your security policy allows. Origin will warn you in the dashboard 14 days before the secret expires (the integration’s status flips from Connected to At risk) so you can rotate before sync stops.
- Click Add.
Connect from the Origin Dashboard
- Sign in to your Origin dashboard at
https://dashboard.originhq.com/. - Go to Directory Integration in the left sidebar → + Add Integration (or click Add your first integration if this is the first one).
- Select Entra ID (Microsoft Entra ID).
- Fill in the connection form:
- Display Name — anything; this is just a label in the integrations list.
- Tenant ID — paste the Directory (tenant) ID from the app registration step.
- Client ID — paste the Application (client) ID from the app registration step.
- Client Secret — paste the Value you copied when creating the client secret.
- Click Connect with Entra ID.
Trigger Your First Sync
Verify in the Directory Browser
- Go to Directory Integration → Directory Browser tab.
- The Users tab should list everyone Origin pulled.
- Click any user. The detail panel shows their direct groups under a Groups subsection — click any group to deep-link into that group’s detail.
- Go to the Groups tab → click any group. The detail panel shows direct user members and direct sub-groups (if your tenant uses nested groups). Click any member to jump back to that user.
- Check the Devices tab — Intune-managed devices show their serial number; Entra-joined devices that Intune hasn’t seen show a blank serial and the device’s
displayName. Both share an Owner column resolved against synced users.
What gets synced (manual setup)
Synced — full list:- Users (active and disabled) — display name, email, UPN, department, job title, office, manager, last sign-in (best-effort — see Before you begin (manual setup)), account-enabled flag.
- Groups — display name, description, type (security / distribution / Microsoft 365), member count, direct memberships, direct sub-groups.
- Entra-joined devices — display name, OS, OS version, registered owners.
- Intune-managed devices — hardware serial number, model, manufacturer, assigned UPN, compliance state, OS, OS version.
- Photos, contacts, mailbox metadata, OneDrive, calendars, or any tenant data outside the directory itself.
- Conditional Access policies, role assignments, or audit logs.
- Service principals or managed identities.
- Personal-access guest accounts (
#EXT#UPN suffix) — these are filtered out at sync time so they don’t appear as “users” in the Directory Browser.
Troubleshooting (manual setup)
Connect to Entra fails immediately with a 400
Connect to Entra fails immediately with a 400
- The redirect URI in Entra exactly matches
https://dashboard.originhq.com/integrations/oauth-callback. - The tenant ID and client ID in the dashboard form match the Directory (tenant) ID and Application (client) ID on the app’s Overview page — not the Object ID, which is a different value.
Admin consent succeeds but Origin shows 'No credentials stored'
Admin consent succeeds but Origin shows 'No credentials stored'
Sync row is red with 'Azure token acquisition failed'
Sync row is red with 'Azure token acquisition failed'
- The secret expired. Check Certificates & secrets in Entra; if the Expires column is in the past, generate a new secret and use the integration’s Edit action to update it.
- The secret was revoked. Same fix as above.
- The application was deleted from Entra. Re-register the application from the first step.
Sync runs but users and groups stay at zero
Sync runs but users and groups stay at zero
User.Read.All and Group.Read.All application permissions, or admin consent wasn’t granted for them. Return to the Graph permissions step, confirm both rows have green checks under Status, and trigger the sync again.Sub-groups column is always empty
Sub-groups column is always empty
Rotating the Client Secret
Origin shows a yellow At risk badge on the integration when the secret is within 14 days of expiry. To rotate without dropping sync:- Generate a new client secret in Entra. Don’t delete the old one yet.
- In the Origin dashboard, click Edit on the integration row, paste the new Value into the Client Secret field, and save.
- Trigger a manual sync. If it succeeds, the new secret is live.
- Delete the old secret from Entra.
Removing the Integration
To stop syncing without revoking access in Entra:- Go to Directory Integration → click Delete in the row’s Actions column. Origin tears down its end and tombstones the directory data (eligible for hard-delete after the retention window in your tenant settings, default 90 days).
- Optionally revoke admin consent from your tenant: in Entra, go to Identity → Applications → Enterprise applications → pick your Origin Directory Sync app → Permissions → Review permissions → This application has more permissions than I want it to have. This revokes the granted permissions but leaves the app registration in place so you can re-grant later.
- To fully remove the app, delete it from App registrations in Entra.