> ## Documentation Index
> Fetch the complete documentation index at: https://docs.originhq.com/llms.txt
> Use this file to discover all available pages before exploring further.
# Okta Setup: Sync Users and Groups to Origin
> Connect Okta to Origin using a read-only API Services app with public-key authentication — no client secret to store or rotate.
Connect Origin to Okta so your users, groups, group memberships, and devices stay in sync with your directory. Once connected, the synced data appears in the **Directory Browser** in your Origin dashboard, and each endpoint Origin sees is correlated to the person and device it belongs to.
Origin authenticates to Okta as an **API Services app** using **public key / private key** client authentication (OAuth 2.0 client credentials with a JWKS URL) — not a stored client secret or API token. Origin signs in with its own key, so there's no secret sitting in Okta or in Origin's database to leak or rotate.
## What you'll end up with
| Synced from Okta | Origin surface |
| -------------------------------- | --------------------------------------- |
| Users | Directory Browser → **Users** tab |
| Groups (including nested groups) | Directory Browser → **Groups** tab |
| User → group memberships | Click a user → **Groups** panel |
| Registered devices | Directory Browser → **Devices** tab |
| Endpoint ↔ user correlation | Endpoint detail → **Assigned identity** |
## Before you begin
You need:
1. **An Okta admin who can create app integrations and assign admin roles** — someone who can create an **API Services** app under **Applications** and grant it the **Read-only Administrator** role.
2. **An Origin admin account** — only Origin admins can create directory integrations.
3. Your **Okta domain** — the host you sign in to (for example `yourorg.okta.com`). European (`.okta-emea.com`) and preview (`.oktapreview.com`) orgs are also accepted.
You do **not** need to generate or store a client secret. Origin's public key is published and Okta fetches it directly — see the setup steps below.
## Setup steps
1. Sign in to the Origin dashboard.
2. Click **Admin** in the left sidebar, then select **Identity**.
3. Click **Add Integration**.
4. In the **New integration** dialog:
* **Display name** — a label for this integration, e.g. `Okta`.
* **Provider** — set to **Okta** (use **Change** if it isn't already selected).
* **Okta domain** — enter your Okta host, e.g. `yourorg.okta.com`.
5. Click **Continue**.
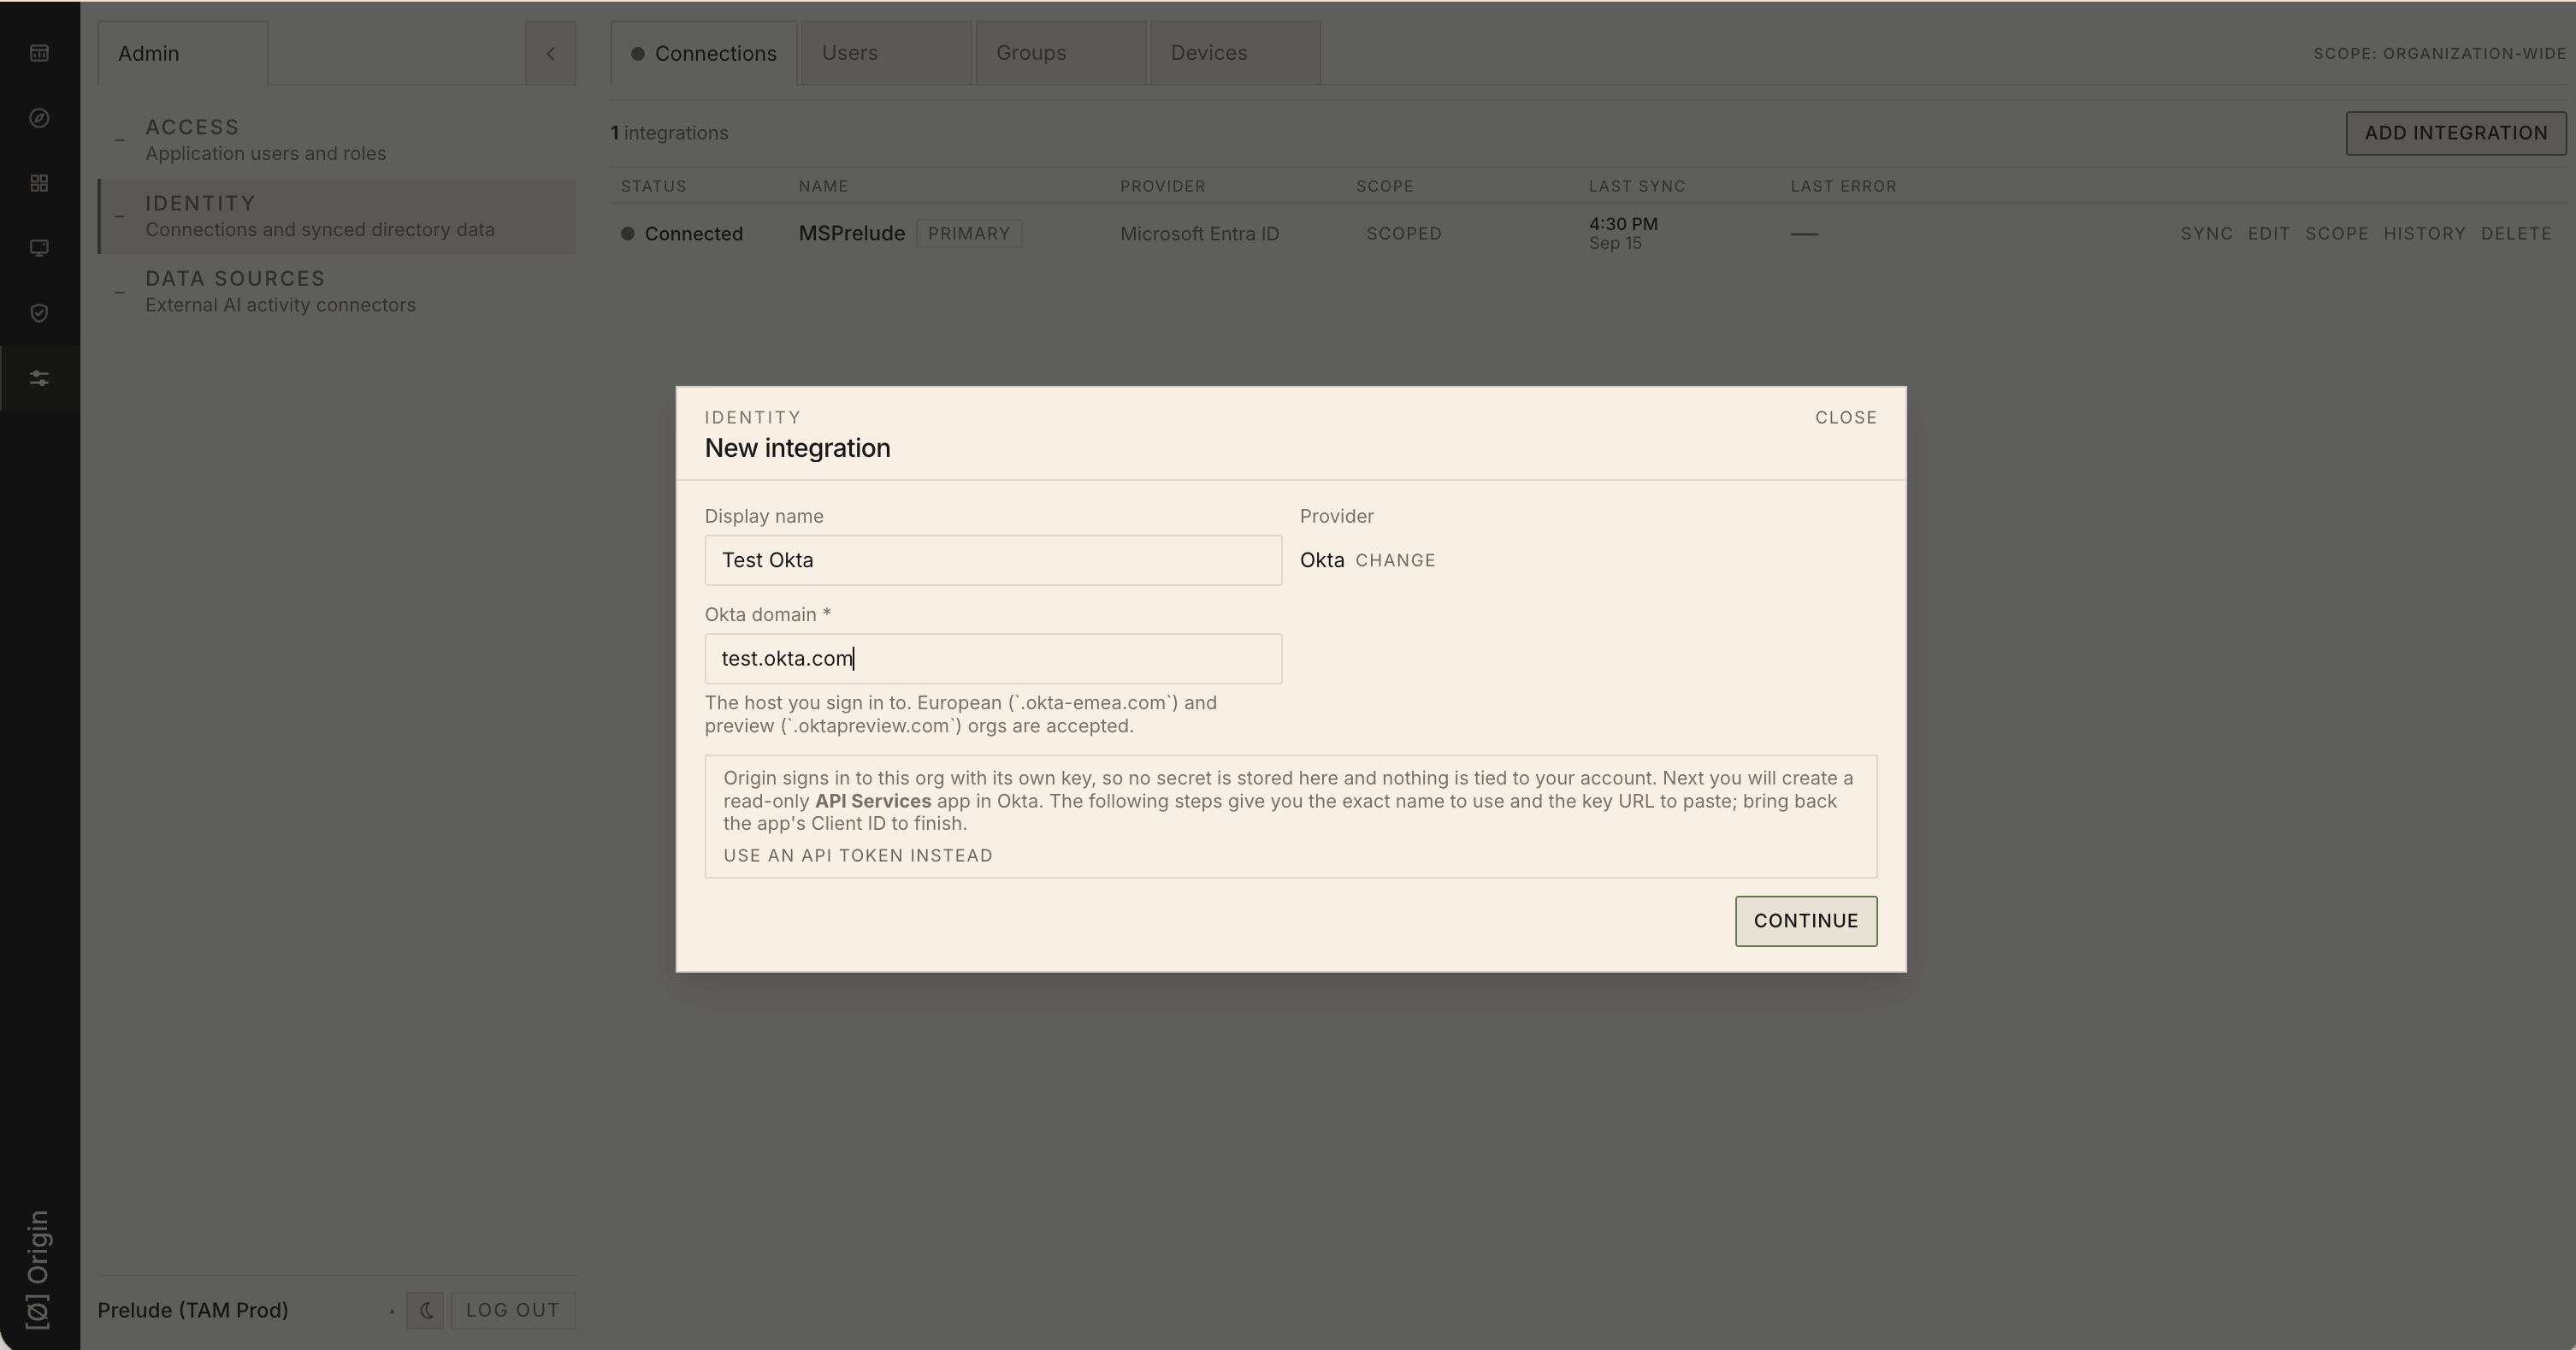 Origin generates a unique app name and key URL for this integration and shows the steps to finish setup in Okta.
Origin now shows a **Finish setting up in Okta** panel with the exact values to use. Keep this panel open — you'll come back to it after saving the app in Okta.
1. In your Okta domain, go to **Applications → Create App Integration → API Services**.
2. **Name it exactly** the app name Origin generated (e.g. `origin-0ed37d524d3a`). Connecting reads the name back to confirm you own the org, so it must match character for character. Click **Copy** next to **App Name** in Origin to avoid typos.
Origin generates a unique app name and key URL for this integration and shows the steps to finish setup in Okta.
Origin now shows a **Finish setting up in Okta** panel with the exact values to use. Keep this panel open — you'll come back to it after saving the app in Okta.
1. In your Okta domain, go to **Applications → Create App Integration → API Services**.
2. **Name it exactly** the app name Origin generated (e.g. `origin-0ed37d524d3a`). Connecting reads the name back to confirm you own the org, so it must match character for character. Click **Copy** next to **App Name** in Origin to avoid typos.
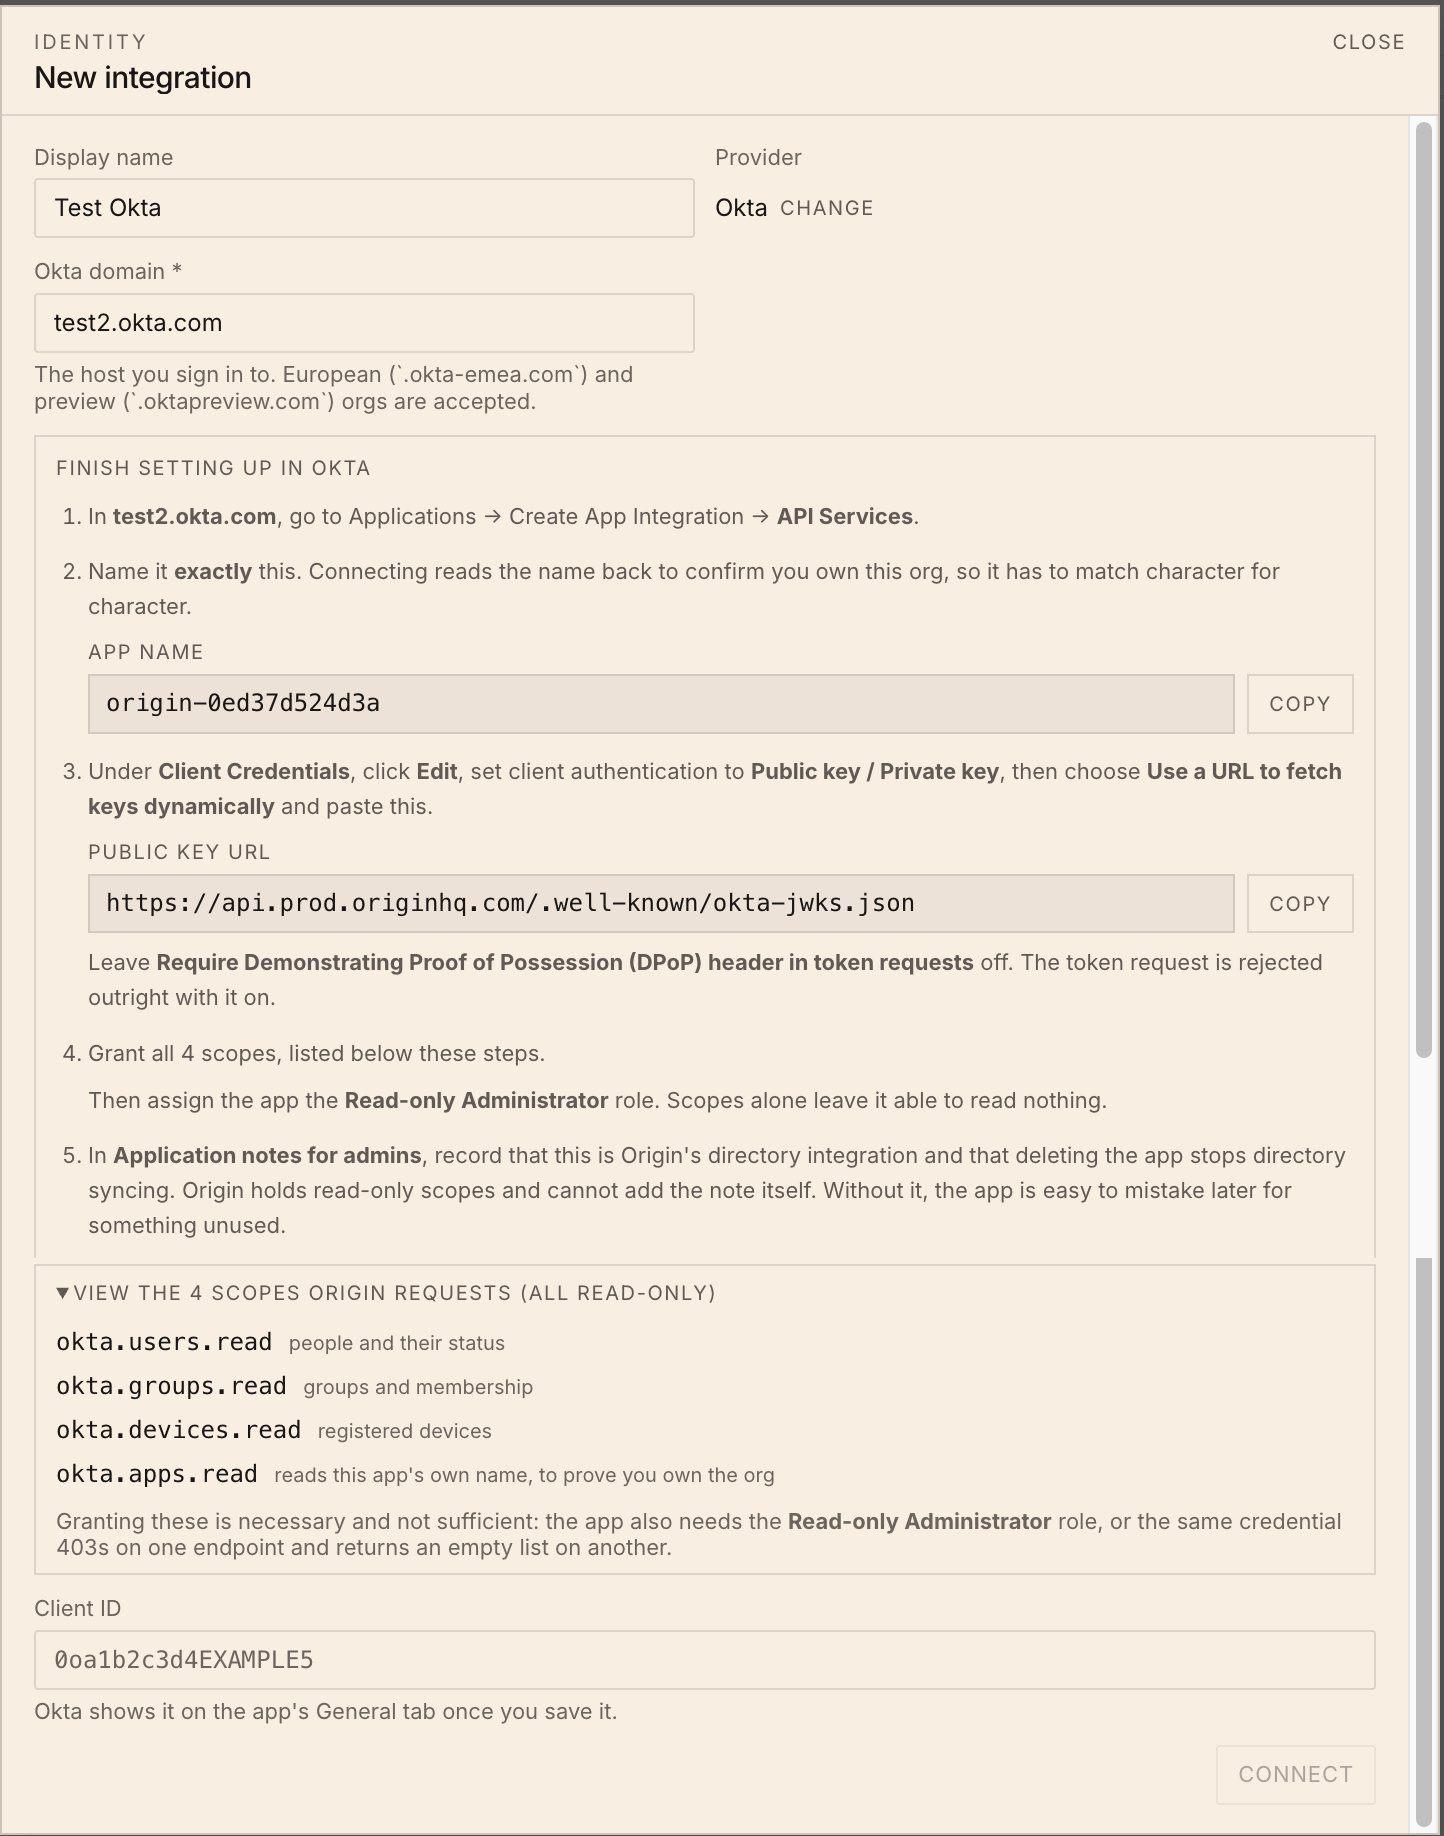 The app name is unique to this integration attempt. If you restart the **Add Integration** flow, Origin generates a new name — always copy the current one from the dialog rather than reusing a name from a screenshot or previous attempt.
Still on the new app in Okta:
1. Under **Client Credentials**, click **Edit**.
2. Set **Client authentication** to **Public key / Private key**.
3. Choose **Use a URL to fetch keys dynamically** and paste the **Public Key URL** Origin gave you:
```text theme={null}
https://api.prod.originhq.com/.well-known/okta-jwks.json
```
4. Leave **Require Demonstrating Proof of Possession (DPoP) header in token requests** **off**. Okta rejects the token request outright if it's on.
This is what lets Origin authenticate without a shared secret — Okta fetches Origin's current public key from that URL on each token request and verifies Origin's signed assertion against it.
1. Grant the app all four scopes below (all read-only):
| Scope | What it's for |
| ------------------- | --------------------------------------------------- |
| `okta.users.read` | People and their status |
| `okta.groups.read` | Groups and membership |
| `okta.devices.read` | Registered devices |
| `okta.apps.read` | Reads this app's own name, to prove you own the org |
2. Assign the app the **Read-only Administrator** role. Granting the scopes above is necessary but not sufficient on its own — without the admin role, the same credential 403s on some endpoints and returns an empty list on others.
3. In **Application notes for admins**, add a note that this app is Origin's directory integration and that deleting it stops directory syncing. Origin holds only read-only scopes and can't add this note itself — without it, the app is easy to mistake later for something unused.
4. Save the app.
1. Okta shows the app's **Client ID** on its **General** tab once you save it. Copy it.
2. Back in Origin's **New integration** dialog, paste it into the **Client ID** field.
3. Click **Connect**.
Origin verifies the app name and credentials, then starts the first sync.
From **Admin → Identity**, the integration row should show **Status: Connected**, with **Provider: Okta** and a recent **Last Sync** time.
Then check the **Directory Browser**:
1. **Users** — should list everyone in your Okta org. Click any user to see their direct groups.
2. **Groups** — click any group to see its direct user members and sub-groups.
3. **Devices** — registered devices resolve an **Owner** against the synced users.
If you've registered endpoints in Origin and their serial numbers or hostnames match, those endpoints light up with the matched directory user under **Assigned identity**.
## What gets synced (and what doesn't)
**Synced:**
* Users (active and suspended) — profile fields, status, group memberships.
* Groups — name, description, membership, and nesting.
* Devices registered in Okta — device name, platform, and assigned user.
**Not synced:**
* Okta applications, sign-on policies, or authentication policies.
* MFA factors or credentials.
* Any Okta System Log / audit data.
## Managing the integration
* **Rotate:** Origin's authentication key is managed on Origin's side and rotates automatically — there's no customer-side secret to rotate. If you need to re-establish trust (for example, after editing the Okta app), re-open **Add Integration** to regenerate the app name and Client ID pairing.
* **Remove:** Delete the integration from its row in **Admin → Identity**. Syncing stops; data already in Origin follows your tenant's retention settings. To fully revoke access on the Okta side, delete the API Services app from **Applications** in Okta.
## Troubleshooting
The app name in Okta doesn't exactly match the name Origin generated. Reopen the integration's setup panel in Origin, copy the **App Name** again, and rename the Okta app to match it character for character (including the `origin-` prefix and casing).
Confirm **Require Demonstrating Proof of Possession (DPoP) header in token requests** is **off** — Okta rejects the token request outright with it on. Also confirm the **Public Key URL** was entered exactly as `https://api.prod.originhq.com/.well-known/okta-jwks.json`, with no trailing characters.
The app is missing the **Read-only Administrator** role. The four `okta.*.read` scopes alone aren't sufficient — assign the role in the app's **Admin roles** tab in Okta, then trigger a sync again.
Okta only shows the Client ID on the app's **General** tab after you save it. If you closed the app before saving, reopen it from **Applications** in Okta — the Client ID is stable and doesn't change on subsequent visits.
The app name is unique to this integration attempt. If you restart the **Add Integration** flow, Origin generates a new name — always copy the current one from the dialog rather than reusing a name from a screenshot or previous attempt.
Still on the new app in Okta:
1. Under **Client Credentials**, click **Edit**.
2. Set **Client authentication** to **Public key / Private key**.
3. Choose **Use a URL to fetch keys dynamically** and paste the **Public Key URL** Origin gave you:
```text theme={null}
https://api.prod.originhq.com/.well-known/okta-jwks.json
```
4. Leave **Require Demonstrating Proof of Possession (DPoP) header in token requests** **off**. Okta rejects the token request outright if it's on.
This is what lets Origin authenticate without a shared secret — Okta fetches Origin's current public key from that URL on each token request and verifies Origin's signed assertion against it.
1. Grant the app all four scopes below (all read-only):
| Scope | What it's for |
| ------------------- | --------------------------------------------------- |
| `okta.users.read` | People and their status |
| `okta.groups.read` | Groups and membership |
| `okta.devices.read` | Registered devices |
| `okta.apps.read` | Reads this app's own name, to prove you own the org |
2. Assign the app the **Read-only Administrator** role. Granting the scopes above is necessary but not sufficient on its own — without the admin role, the same credential 403s on some endpoints and returns an empty list on others.
3. In **Application notes for admins**, add a note that this app is Origin's directory integration and that deleting it stops directory syncing. Origin holds only read-only scopes and can't add this note itself — without it, the app is easy to mistake later for something unused.
4. Save the app.
1. Okta shows the app's **Client ID** on its **General** tab once you save it. Copy it.
2. Back in Origin's **New integration** dialog, paste it into the **Client ID** field.
3. Click **Connect**.
Origin verifies the app name and credentials, then starts the first sync.
From **Admin → Identity**, the integration row should show **Status: Connected**, with **Provider: Okta** and a recent **Last Sync** time.
Then check the **Directory Browser**:
1. **Users** — should list everyone in your Okta org. Click any user to see their direct groups.
2. **Groups** — click any group to see its direct user members and sub-groups.
3. **Devices** — registered devices resolve an **Owner** against the synced users.
If you've registered endpoints in Origin and their serial numbers or hostnames match, those endpoints light up with the matched directory user under **Assigned identity**.
## What gets synced (and what doesn't)
**Synced:**
* Users (active and suspended) — profile fields, status, group memberships.
* Groups — name, description, membership, and nesting.
* Devices registered in Okta — device name, platform, and assigned user.
**Not synced:**
* Okta applications, sign-on policies, or authentication policies.
* MFA factors or credentials.
* Any Okta System Log / audit data.
## Managing the integration
* **Rotate:** Origin's authentication key is managed on Origin's side and rotates automatically — there's no customer-side secret to rotate. If you need to re-establish trust (for example, after editing the Okta app), re-open **Add Integration** to regenerate the app name and Client ID pairing.
* **Remove:** Delete the integration from its row in **Admin → Identity**. Syncing stops; data already in Origin follows your tenant's retention settings. To fully revoke access on the Okta side, delete the API Services app from **Applications** in Okta.
## Troubleshooting
The app name in Okta doesn't exactly match the name Origin generated. Reopen the integration's setup panel in Origin, copy the **App Name** again, and rename the Okta app to match it character for character (including the `origin-` prefix and casing).
Confirm **Require Demonstrating Proof of Possession (DPoP) header in token requests** is **off** — Okta rejects the token request outright with it on. Also confirm the **Public Key URL** was entered exactly as `https://api.prod.originhq.com/.well-known/okta-jwks.json`, with no trailing characters.
The app is missing the **Read-only Administrator** role. The four `okta.*.read` scopes alone aren't sufficient — assign the role in the app's **Admin roles** tab in Okta, then trigger a sync again.
Okta only shows the Client ID on the app's **General** tab after you save it. If you closed the app before saving, reopen it from **Applications** in Okta — the Client ID is stable and doesn't change on subsequent visits.